


一、源码管理
1.1、从gitee拉取代码到本地
git clone https://gitee.com/yudaocode/yudao-ui-admin-vue3.git
1.2、创建私有仓库项目
yudao-ui-admin-vue3
1.3、配置远程仓库
在本地idea的命令终端中执行
git remote add upstream http://10.0.166.90:2048/yudao/yudao-ui-admin-vue3.git
# 从远程仓库拉取代码,并且将历史记录合并
git pull --allow-unrelated-histories upstream master
二、编写dockerfile
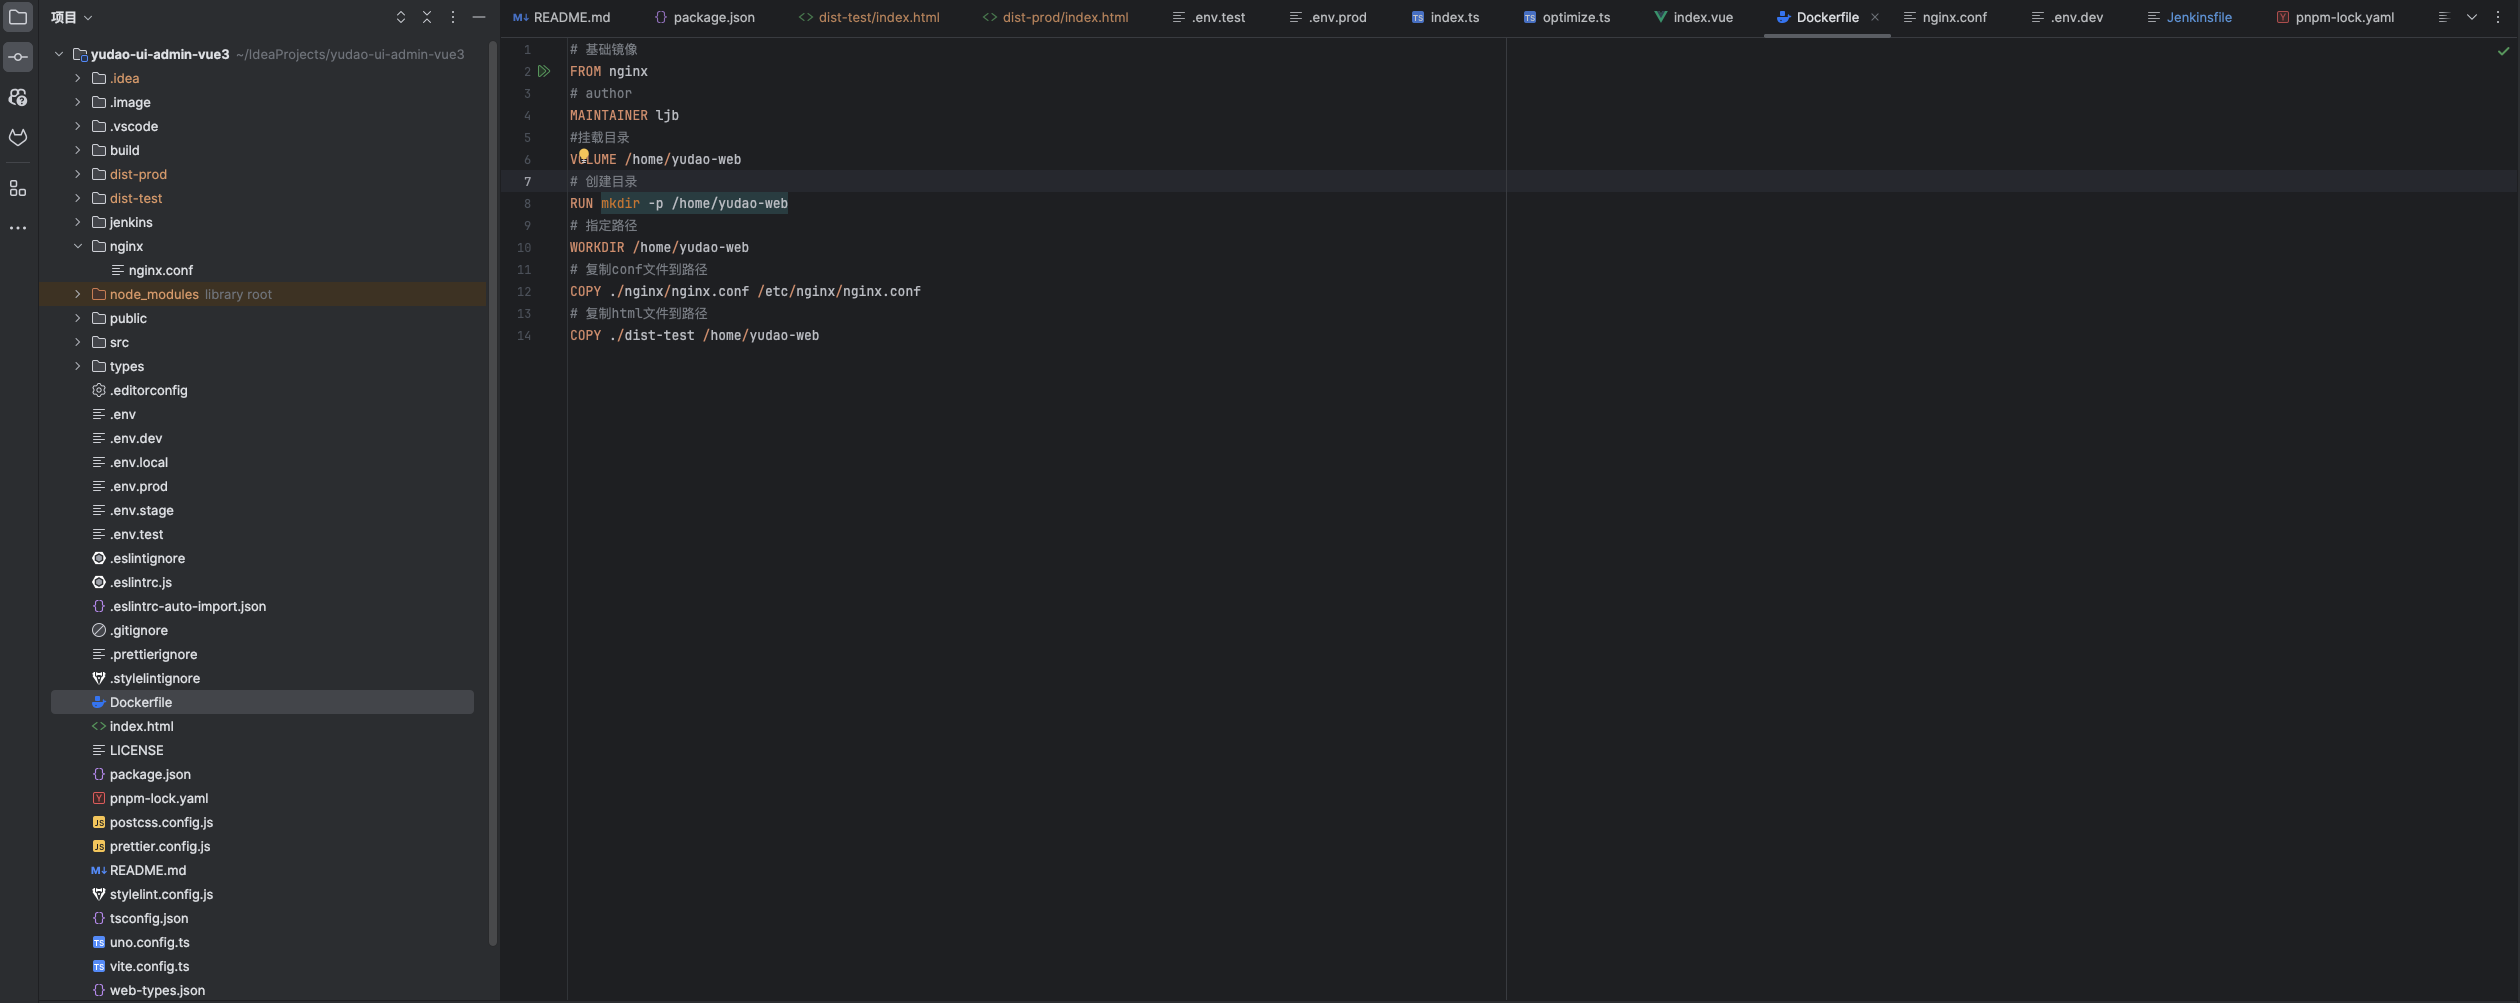
# 基础镜像
FROM nginx
# author
MAINTAINER ljb
#挂载目录
VOLUME /home/yudao-web
# 创建目录
RUN mkdir -p /home/yudao-web
# 指定路径
WORKDIR /home/yudao-web
# 复制conf文件到路径
COPY ./nginx/nginx.conf /etc/nginx/nginx.conf
# 复制html文件到路径
COPY ./dist-test /home/yudao-web
注意:其中的目录需要在后面的nginx中配置使用
三、编写nginx.conf

user  nginx;
worker_processes  1;

events {
    worker_connections  1024;
}

error_log  /var/log/nginx/error.log warn;
pid        /var/run/nginx.pid;

http {
    include       /etc/nginx/mime.types;
    default_type  application/octet-stream;
    sendfile        on;
    keepalive_timeout  65;

    log_format  main  '$remote_addr - $remote_user [$time_local] "$request" '
                      '$status $body_bytes_sent "$http_referer" '
                      '"$http_user_agent" "$http_x_forwarded_for"';
#    access_log  /var/log/nginx/access.log  main;

    gzip on;
    gzip_min_length 1k;     # 设置允许压缩的页面最小字节数
    gzip_buffers 4 16k;     # 用来存储 gzip 的压缩结果
    gzip_http_version 1.1;  # 识别 HTTP 协议版本
    gzip_comp_level 2;      # 设置 gzip 的压缩比 1-9。1 压缩比最小但最快,而 9 相反
    gzip_types text/plain application/x-javascript text/css application/xml application/javascript; # 指定压缩类型
    gzip_proxied any;       # 无论后端服务器的 headers 头返回什么信息,都无条件启用压缩

    server {
        listen       80;
        server_name  _; ## 重要!!!修改成你的外网 IP/域名

        location / { ## 前端项目
            root   /home/yudao-web;
            index  index.html index.htm;
            try_files $uri $uri/ /index.html;
        }

        location /admin-api/ { ## 后端项目 - 管理后台
            proxy_pass http://yudao-cloud-server.k8stest:8080/admin-api/; ## 重要!!!proxy_pass 需要设置为后端项目所在服务器的 IP
            proxy_set_header Host $http_host;
            proxy_set_header X-Real-IP $remote_addr;
            proxy_set_header REMOTE-HOST $remote_addr;
            proxy_set_header X-Forwarded-For $proxy_add_x_forwarded_for;
        }

        location /app-api/ { ## 后端项目 - 用户 App
            proxy_pass http://yudao-cloud-server.k8stest:8080/app-api/; ## 重要!!!proxy_pass 需要设置为后端项目所在服务器的 IP
            proxy_set_header Host $http_host;
            proxy_set_header X-Real-IP $remote_addr;
            proxy_set_header REMOTE-HOST $remote_addr;
            proxy_set_header X-Forwarded-For $proxy_add_x_forwarded_for;
        }

    }
    include /etc/nginx/conf.d/*.conf; ## 加载该目录下的其它 Nginx 配置文件
}
注意:访问后端的请求路径及前端代码的目录位置
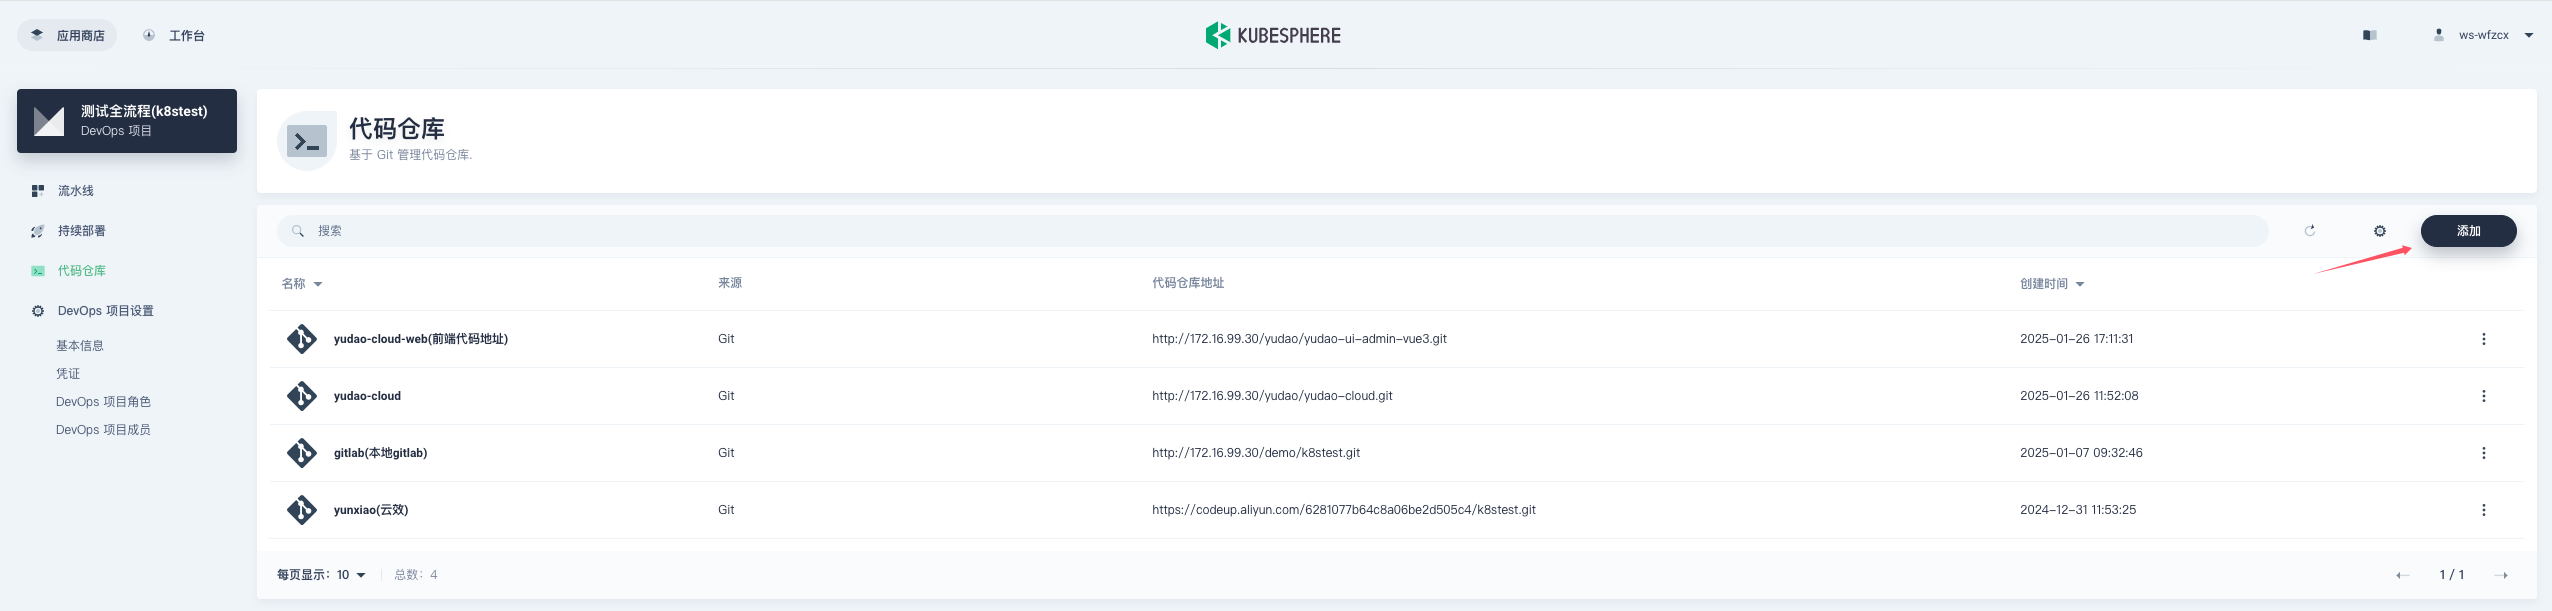
四、devops中配置凭证及仓库

五、devops中配置流水线
pipeline {
  agent {
    node {
      label 'nodejs20'
    }

  }
  stages {
    stage('拉取代码') {
      agent none
      steps {
        git(url: 'http://172.16.99.30/yudao/yudao-ui-admin-vue3.git', credentialsId: 'gitlab', branch: 'master', changelog: true, poll: false)
      }
    }

    stage('安装依赖') {
      agent none
      steps {
        container('nodejs') {
          sh '''npm config set registry https://registry.npmmirror.com
npm install -g pnpm
pnpm -version
pnpm install --unsafe-perm'''
        }

      }
    }

    stage('构建项目') {
      agent none
      steps {
        container('nodejs') {
          sh '''./node_modules/vite/bin/vite.js -version
npm run build:test'''
        }

      }
    }

    stage('上传镜像') {
      agent none
      steps {
        container('nodejs') {
          withCredentials([usernamePassword(credentialsId: 'harbor-test', passwordVariable: 'HBTEST_PASS', usernameVariable: 'HBTEST_USER')]) {
            sh '''echo "$HBTEST_PASS" | docker login $HB_TEST_REGISTRY -u "$HBTEST_USER" --password-stdin
docker build -t $HB_TEST_REGISTRY/$HB_TEST_REGISTRY_PROJECT/yudao-web:$HB_TEST_APP_VERSION -f Dockerfile .
docker push $HB_TEST_REGISTRY/$HB_TEST_REGISTRY_PROJECT/yudao-web:$HB_TEST_APP_VERSION'''
          }

        }

      }
    }

  }
  parameters {
    string(name: 'HB_TEST_REGISTRY', defaultValue: '172.17.100.90:80', description: '仓库地址')
    string(name: 'HB_TEST_REGISTRY_PROJECT', defaultValue: 'yudao-cloud', description: '项目地址')
    string(name: 'HB_TEST_APP_VERSION', defaultValue: 'latest', description: '版本号')
  }
}
备注:其中nodejs20为自主创建agent,也可以直接使用kubenetes形式,将上述文件的agent改为如下方式,但是改为如下方式,镜像中是官方镜像并没有安装docker以及kubectl,此时无法执行相应的docker以及kubectl命令,有两种方式:第一种,可以从官方kubeshere内置的nodejs镜像中集成,然后改在自己所需要的node版本使用即可;第二种,需要使用docker跟kubectl的地方在base镜像中使用,不在nodejs中使用
agent {
    kubernetes {
      inheritFrom 'nodejs base'
      containerTemplate {
        name 'nodejs'
        image 'node:20.17.0'
      }
    }
  }
方式二:
pipeline {
  agent {
    kubernetes {
      inheritFrom 'nodejs base'
      containerTemplate {
        name 'nodejs'
        image 'node:20.17.0'
      }
    }

  }
  stages {
    stage('拉取代码') {
      agent none
      steps {
        git(url: 'http://172.16.99.30/yudao/yudao-ui-admin-vue3.git', credentialsId: 'gitlab', branch: 'master', changelog: true, poll: false)
      }
    }

    stage('安装依赖') {
      agent none
      steps {
        container('nodejs') {
          sh '''npm config set registry https://registry.npmmirror.com
npm install -g pnpm
pnpm -version
pnpm install --unsafe-perm'''
        }

      }
    }

    stage('构建项目') {
      agent none
      steps {
        container('nodejs') {
          sh '''./node_modules/vite/bin/vite.js -version
npm run build:test'''
        }

      }
    }

    stage('上传镜像') {
      agent none
      steps {
        container('base') {
          withCredentials([usernamePassword(credentialsId: 'harbor-test', passwordVariable: 'HBTEST_PASS', usernameVariable: 'HBTEST_USER')]) {
            sh '''echo "$HBTEST_PASS" | docker login $HB_TEST_REGISTRY -u "$HBTEST_USER" --password-stdin
docker build -t $HB_TEST_REGISTRY/$HB_TEST_REGISTRY_PROJECT/yudao-web:$HB_TEST_APP_VERSION -f Dockerfile .
docker push $HB_TEST_REGISTRY/$HB_TEST_REGISTRY_PROJECT/yudao-web:$HB_TEST_APP_VERSION'''
          }

        }

      }
    }

  }
  parameters {
    string(name: 'HB_TEST_REGISTRY', defaultValue: '172.17.100.90:80', description: '仓库地址')
    string(name: 'HB_TEST_REGISTRY_PROJECT', defaultValue: 'yudao-cloud', description: '项目地址')
    string(name: 'HB_TEST_APP_VERSION', defaultValue: 'latest', description: '版本号')
  }
}
六、创建服务
创建无状态的服务,并且需要开启外部访问
七、修改访问地址
修改配置文件.env.test的地址,前端的地址及端口
# 测试环境:只在打包时使用
NODE_ENV=production

VITE_DEV=false

# 请求路径
VITE_BASE_URL='http://172.17.100.100:30069'

# 文件上传类型:server - 后端上传, client - 前端直连上传,仅支持S3服务
VITE_UPLOAD_TYPE=server

# 接口地址
VITE_API_URL=/admin-api

# 是否删除debugger
VITE_DROP_DEBUGGER=true

# 是否删除console.log
VITE_DROP_CONSOLE=true

# 是否sourcemap
VITE_SOURCEMAP=false

# 打包路径
VITE_BASE_PATH=/

# 输出路径
VITE_OUT_DIR=dist-test

# 商城H5会员端域名
VITE_MALL_H5_DOMAIN='http://mall.yudao.iocoder.cn'

# GoView域名
VITE_GOVIEW_URL='http://127.0.0.1:3000'
八、访问系统

评论区